Recipe: Vegetable Beef Soup (WW Blue – less than 1 point per serving)

I made a WW-friendly vegetable beef soup today, and it is delicious! The video will walk you through how to make it. The recipe is below.

The soup base is:

1 lb. 96% lean ground beef (10 WW Blue points)

2-3 can diced tomatoes (0 points)

1 can tomato sauce (0 points)

1 quart beef broth (0 point)*

approx. 1 cup chopped onion, 1/2 cup chopped celery (0 points)

Salt and pepper, to taste (0 points)

Directions: Brown the ground beef in a large soup pot. Add the diced tomatoes, tomato sauce, and beef broth. Salt and pepper, to taste.

Now add your vegetables – I usually buy a bag of frozen soup vegetables. However, you can use fresh, frozen, or canned (drain canned vegetables) – corn, carrots, peas, beans, garlic, peppers, potatoes (count the points for potatoes).

Bring to a boil. You can add more beef broth if the soup is too thick. Let the soup simmer for a couple hours to thoroughly meld all the flavors.

This soup will keep in the refrigerator for several days, and it freezes well.

POINTS: I add additional beef broth, if needed, to bring my total amount to 18 cups – which equals 18 servings.

10 total points divided by 18 servings – .555 points (which rounds of to 1 point.

*Some beef broths scan as 0 points for a quart, and some scan as 1 or 2 points for a quart. It depends on the fat content of the particular broth you buy. Scan the broth you use to figure your points. However, even at 2 points a quart, the total still equals less than 1 point per cup/serving.


A Better Cheesy Biscuit With Egg

My sister saw my post with the recipe for Cheesy Biscuits with Eggs, and she came up with a MUCH simpler way to make them. She took the dough for each serving, rolled it into a long “log” and then brought the edges together to form a circle.  So much simpler! And the egg fits into the hole much better, too!  

So here is the revised recipe:

Make the dough first. This makes four servings. 

1 cup self-rising flour (11 points)
1/2  teaspoon yeast (0 points)
1/2 teaspoon salt (0 points)
1/4  cup plain nonfat Greek yogurt (0 points)
1/4  cup warm water (0 points)
Pam cooking spray, butter flavor (0 points)
 
  • Preheat the oven to 475 degrees.
  • Prepare a small baking dish with a sheet of parchment paper or a spray of butter-flavored PAM.
  • Set aside about 1/4 cup of the flour to use later.
  • In a bowl, mix 3/4  cup of the flour with the yeast and salt. 
  • Add the yogurt and warm water and mix well. You should have a sticky ball of dough
  • Sprinkle some of the reserved flour on a clean counter or pastry mat. (I actually used a paper towel).
  • Dump out the dough onto the floured mat.
  • Sprinkle more of the reserved flour on the dough, gently fold it over, and repeat until a good ball of dough is formed. Knead the rest of the flour into the dough.
  • Spray your hands with Pam, take the dough and form it into 4 balls of equal size.
  • Note: If you want to make only one or two servings, before cooking at all, wrap the unused dough in a ziplock bag and keep it in the refrigerator till you’re ready to use it. The extra can be used for this recipe, pizza dough, or any other dish requiring bread.
  • Roll each ball into a long log shape and then press the ends together to form a circle, and place the 4 circles on the baking sheet.  Make the circle large enough to hold an egg in the middle. 
  • (optional) Let rise for about 30 minutes. This step will make the dough rise more, but it is delicious without this step.
  • Bake at 475 degrees for about 4-6 minutes until puffed but not browned.
  • Remove baking sheet from oven.

Toppings: Here is a photo of my toppings – chopped tomatoes, grated Cabot 75% reduced fat cheddar cheese, a slice of Canadian bacon, finely chopped onion, chopped spinach leaves.

  • Working quickly so the biscuit doesn’t cool too much, place a slice of Canadian bacon underneath each of the biscuit circles.
  • Crack an egg into each biscuit cup. If you look at the photos below, you will see that the egg white flowed over the top of the biscuit, but it was okay. When I took them out of the oven, they were fine. 
  • Season with salt and pepper. Add other toppings, as desired – just keep track of the points.
  • Return the baking sheet to the oven and continue baking until the biscuits are golden and the egg whites are set, about 10 minutes more.


(Photo below) It’s ready to go in the oven! I’ve piled on so many toppings that you can’t even see the egg except for where part of the white overflowed at the top of the photo. You will see in the next photo that after it has cooked, the white overflowing doesn’t make any difference – still delicious!


And here it is – ready to eat.  Absolutely delicious!

Counting the points: Each biscuit (4 biscuits per recipe) is 3 points. Add the points for any toppings you add.

Baked Cheesy Biscuits with Eggs (4 points each, WW Blue)

The idea for these came from my sister, Janice, who posted the recipe on Facebook.  It’s a White Lily Flour recipe.  I revised it to better fit in with the WW Blue Plan, and I actually came up with a couple of variations. These are 4 points each (WW Blue Plan) if you use the Velveeta slices, and 3 points if you use the Canadian bacon. I had one for dinner tonight, and I am stuffed!

Here’s the recipe:

Baked Cheesy Biscuits with Eggs

1 cups self-rising flour (11 points)
4 eggs (0 points)
1/2  teaspoon yeast (0 points)
1/4  cup plain nonfat Greek yogurt (0 points)
1/4  cup warm water (0 points)
1/2 teaspoon salt (0 points)
Pam cooking spray, butter flavor (0 points)
4 slices Velveeta cheese (6 points) OR 4 slices Canadian Bacon (1)  OR a combination of both. Just figure out the correct points.
Pam Cooking Spray, No-Stick, Butter Flavor (0 points)
salt/pepper, to taste
Other toppings you might want to add: spinach, onion – whatever you like.
  • In a large bowl, mix 3/4  cup of the flour with the yeast and salt. Reserve the extra 1/4 cup of the flour for later.
  • Add the yogurt and stir until it starts to form a ball.
  • Add the warm water and mix well. You should have a sticky ball of dough.
  • Sprinkle some of the reserved flour on a clean counter or pastry mat. (I actually used a paper towel).
  • Dump out the dough onto the floured mat.
  • Sprinkle more of the reserved flour on the dough, gently fold it over, and repeat until a good ball of dough is formed.
  • Spray your hands with Pam, take the dough and form it into 4 biscuits of equal size.
  • Take a small round cookie cutter and cut out a hole in each biscuit. Place the cut out rounds and the larger biscuits on a baking sheet lined with parchment paper. You can push on the inner circle to widen it.  Trust me, you want that circle to be big enough to hold an egg!  Those circles that look so big in the photo close in a lot when they cook!
  • Spray the tops lightly with butter-flavored Pam.
  • Let rise for about 30 minutes.
  • Bake at 475 degrees for about 6-8 minutes until puffed but not browned.
  • Remove baking sheet from oven.
  • Either drape a slice of cheese over each of the large biscuits – using your finger to press it into the opening to form a deep cup, OR make four cuts on a slice of Canadian bacon (see photo) and overlap the edges to tuck it into the opening to form a deep cup. 
  • Crack an egg into each biscuit cup. If you look at the photos below, you will see that the egg white flowed over the edges of the biscuits. I worried, but when I took them out of the oven, they were fine. I even had a yolk roll over the edge of the biscuit. I just scooped it up with a spoon and put it back. LOL!
  • Season with salt and pepper. Sprinkle other toppings – grated cheese on the ones with Canadian bacon (measure and count the points), chopped spinach leaves, etc.
  • Return the baking sheet to the oven and continue baking until the biscuits are golden and the egg whites are set, about 10 minutes more.
  • Serve immediately.

Notice in the photo above, the egg white that flowed out into the pan. It was fine! The top two have the slice of Velveeta, and the bottom two have the Canadian bacon. I liked the ones with the Canadian bacon best – and they were one point lower! Both were delicious, though!  A serving includes one of the large biscuits with the egg in the middle along with one of the smaller cutouts.

Zero-Point Taco Soup

The weather has turned cooler, and I saw something on Facebook about Zero-Point Taco Soup. I didn’t need persuading – that immediately became what I would make for dinner. I didn’t have taco seasoning on hand, and so I made a quick trip to Kroger to get some.

Within ten minutes of getting home, the soup was simmering on the stove. What could be simpler than opening a bunch of cans, a package of chicken breasts, and some seasoning, and dump it all in the cooking pot! The only other step was to shred the chicken after it had cooked.

I served it with a dollop of nonfat Greek yogurt (instead of sour cream) and a little grated Cabot 75% Reduced Fat Sharp Cheddar Cheese. Both of those are 0-points, too. If I used more (half ounce +) of the Cabot cheese, it would move to a point, but I kept it under 1/2 ounce. It was both tasty and filling. It tasted so good, I had a second bowl – and I counted the cheese as 1 point since I had two helpings of it!

The soup freezes well. So I will put some in the refrigerator to eat over the next couple days, and I will put some in the freezer to enjoy again in a few weeks.

Here is how I made it:

Zero-Point Taco Soup

  • 4 cans beans (black beans, kidney beans, pinto beans, great northern beans – whatever kind you like or a combination of beans. I used Kroger’s Tri-Bean Blend)
  • 1 can diced tomatoes
  • 1 large can tomato sauce OR pureed tomatoes
  • 1 qt. chicken broth (you can use less if you want your soup to be thicker)
  • 2 Tablespoons taco seasoning (add more or less, depending on your taste)
  • 1 lb. boneless/skinless chicken breasts
  • diced onion, peppers, garlic – to taste (can use fresh or dehydrated)
  • salt/pepper to taste

Directions:

  1. Dump everything into a large saucepan (or crockpot)
  2. Bring to a simmer
  3. Once chicken is cooked through, take it out, shred it, and add it back into the soup.
  4. To serve, you can top with sour cream or Greek yogurt, grated cheese, corn chips – whatever toppings you like

Zero Points on WW Blue Plan. Be sure to add points for any toppings you choose.

Chick Fil A to the Rescue

Chick Fil A has become my go-to for fast food. I can get a 12-piece grilled nuggets (0 points), barbecue sauce packet (2 points), a small fruit cup (0 points), and I usually have my own Yeti tumbler of ice water with me. If not, I can get a Diet Coke or diet lemonade. It provides a tasty 2-point lunch (or dinner).

I got out of the house today, and after running my errands, I did my Chick Fil A run, and I’m good to go till dinner time. I will likely enjoy some frozen grapes when I get home, and I want to make some low-point muffins, too.

Ron will likely stop by Whole Foods on his way home and get fish for us to grill for dinner. Ron eats fish on a daily basis. I can eat it several days week. Halibut, especially, is my favorite.


Zero Point Cheesecake

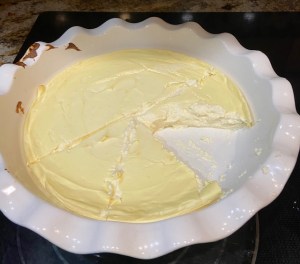
I saw a recipe today for a zero-point cheesecake.  I read over the directions and decided to make it. Of course, I made my own changes to it.  The only artificial sweetener I use is Stevia.  I use only Stevia because I have grown Stevia in my garden before. It’s in the mint family. I’ve chewed on the leaves – and they’re unbelievably sweet! So at least the origin of Stevia sweetener is natural. I know they add artificial stuff to get it into a powdered form. Still, it’s better than sweeteners that are completely concocted in chemistry labs.

I also added an additional egg – to make 4 altogether. The reason I did that is to make the batter thicker and for it to have more substance when it is chilled.

Since I had a big juicy lime in the refrigerator, I decided to make this first one a lime cheesecake.

How did it turn out? This cheesecake is delicious!  I have to admit that I couldn’t wait the recommended two hours for it to cool. So my husband and I split a slice of warm cheesecake.  It makes 8 generous servings.  I used a large deep dish pie plate that I had.  Next time I will use a regular pie plate.

Next time I plan on making a marble cheesecake. Once the batter is in the pan and before I bake it, I will drizzle some sugar-free Hershey syrup on it, and then use a spoon to swirl it through the batter. I will measure the syrup first to be sure and get an exact count of points. The chocolate syrup will probably make the slices 1 point each instead 0 points.

The only ingredient with points in the recipe below is the sugar-free pudding mix. It is 3 points per box. So there are three points in the entire cheesecake.  Technically, that would be 0 points per slice if you make 8 slices.  If you eat more than one slice, I’d count 1 point.

Zero-Point Cheesecake

4 Eggs (0 points)

3 cups Plain Fat-Free Greek Yogurt (0 points)

1 pkg. Instant sugar-free/fat-free cheesecake pudding mix (3 points per box)

1 tsp. Vanilla (0 points)

3 Tablespoons Stevia (0 points)

Pam spray (0 points)

Optional: Flavorings (juice of one lemon or lime, some almond extract, a swirl of sugar-free chocolate syrup, etc.)

  • In a large mixing bowl, combine the eggs, Stevia, vanilla extract, and any other flavoring you’d like.

  • Mix well.

  • Add the yogurt and pudding mix.

  • Mix well.

  • Lightly spray a pie dish with Pam, and pour the batter into the dish. Spread evenly.

  • Bake for 30 minutes at 350 degrees.

  • Chill for at least two hours before serving. 

A Quick 3-Point Meal (breakfast, lunch, or dinner)

I went through my points faster than usual today, and by dinner time, I had 3 points left. I try not to dip into my weekly points, and so I thought of a quick meal for 3 points.

I sprayed a small frying pan with butter-flavored PAM. Then, in a bowl, I mixed 3 eggs with salt and pepper and 2 tablespoons of fat free Greek yogurt (0 points for all that). (Note: I always add something like yogurt or sour cream to scrambled eggs or if I’m making an omelet. As the yogurt/sour cream heats up, it releases steam which makes the eggs fluffier). On a small dish, I measured out exactly 1 tablespoon of shredded cheddar cheese (1 point), and removed the packaging of one laughing cow light Swiss cheese triangle (1-point). I very finely chopped a little bit of fresh onion (about 2 Tablespoons), and chopped up a fresh tomato – I removed the seeds and used a paper towel to pat it dry.  I added the onion and tomato to the small dish with the cheeses.  I toasted one slice of light bread (1 point). In the photo below, I used a small dessert plate. The quantities look larger than they are. The shredded cheese is exactly 1 tablespoon. 

This is a small dessert plate. It looks like more than it is. The shredded cheese is exactly 1 Tablespoon.

I turned the oven to broil. Then, on the stove, I cooked the egg in a frying pan like I would an omelet – using the spatula to move the cooked portion to the middle, letting the uncooked egg fill in the spaces – going round and round the frying pan. I kept the heat fairly low so the egg wouldn’t brown. Once it was mostly cooked, I sprinkled the onion, tomato, and cheeses on top, popped it under the oven broiler and let it finish cooking.

I guess that makes it a frittata. Ha! It was absolutely delicious. Yum yum!! Great meal – very quick – only 3 points – very tasty – very filling.