Baked Cheesy Biscuits with Eggs (4 points each, WW Blue)

The idea for these came from my sister, Janice, who posted the recipe on Facebook.  It’s a White Lily Flour recipe.  I revised it to better fit in with the WW Blue Plan, and I actually came up with a couple of variations. These are 4 points each (WW Blue Plan) if you use the Velveeta slices, and 3 points if you use the Canadian bacon. I had one for dinner tonight, and I am stuffed!

Here’s the recipe:

Baked Cheesy Biscuits with Eggs

1 cups self-rising flour (11 points)
4 eggs (0 points)
1/2  teaspoon yeast (0 points)
1/4  cup plain nonfat Greek yogurt (0 points)
1/4  cup warm water (0 points)
1/2 teaspoon salt (0 points)
Pam cooking spray, butter flavor (0 points)
4 slices Velveeta cheese (6 points) OR 4 slices Canadian Bacon (1)  OR a combination of both. Just figure out the correct points.
Pam Cooking Spray, No-Stick, Butter Flavor (0 points)
salt/pepper, to taste
Other toppings you might want to add: spinach, onion – whatever you like.
  • In a large bowl, mix 3/4  cup of the flour with the yeast and salt. Reserve the extra 1/4 cup of the flour for later.
  • Add the yogurt and stir until it starts to form a ball.
  • Add the warm water and mix well. You should have a sticky ball of dough.
  • Sprinkle some of the reserved flour on a clean counter or pastry mat. (I actually used a paper towel).
  • Dump out the dough onto the floured mat.
  • Sprinkle more of the reserved flour on the dough, gently fold it over, and repeat until a good ball of dough is formed.
  • Spray your hands with Pam, take the dough and form it into 4 biscuits of equal size.
  • Take a small round cookie cutter and cut out a hole in each biscuit. Place the cut out rounds and the larger biscuits on a baking sheet lined with parchment paper. You can push on the inner circle to widen it.  Trust me, you want that circle to be big enough to hold an egg!  Those circles that look so big in the photo close in a lot when they cook!
  • Spray the tops lightly with butter-flavored Pam.
  • Let rise for about 30 minutes.
  • Bake at 475 degrees for about 6-8 minutes until puffed but not browned.
  • Remove baking sheet from oven.
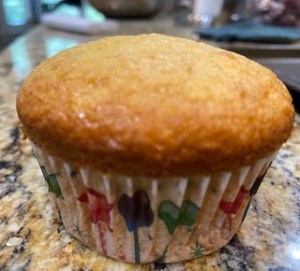
  • Either drape a slice of cheese over each of the large biscuits – using your finger to press it into the opening to form a deep cup, OR make four cuts on a slice of Canadian bacon (see photo) and overlap the edges to tuck it into the opening to form a deep cup. 
  • Crack an egg into each biscuit cup. If you look at the photos below, you will see that the egg white flowed over the edges of the biscuits. I worried, but when I took them out of the oven, they were fine. I even had a yolk roll over the edge of the biscuit. I just scooped it up with a spoon and put it back. LOL!
  • Season with salt and pepper. Sprinkle other toppings – grated cheese on the ones with Canadian bacon (measure and count the points), chopped spinach leaves, etc.
  • Return the baking sheet to the oven and continue baking until the biscuits are golden and the egg whites are set, about 10 minutes more.
  • Serve immediately.

Notice in the photo above, the egg white that flowed out into the pan. It was fine! The top two have the slice of Velveeta, and the bottom two have the Canadian bacon. I liked the ones with the Canadian bacon best – and they were one point lower! Both were delicious, though!  A serving includes one of the large biscuits with the egg in the middle along with one of the smaller cutouts.

Zero-Point Taco Soup

The weather has turned cooler, and I saw something on Facebook about Zero-Point Taco Soup. I didn’t need persuading – that immediately became what I would make for dinner. I didn’t have taco seasoning on hand, and so I made a quick trip to Kroger to get some.

Within ten minutes of getting home, the soup was simmering on the stove. What could be simpler than opening a bunch of cans, a package of chicken breasts, and some seasoning, and dump it all in the cooking pot! The only other step was to shred the chicken after it had cooked.

I served it with a dollop of nonfat Greek yogurt (instead of sour cream) and a little grated Cabot 75% Reduced Fat Sharp Cheddar Cheese. Both of those are 0-points, too. If I used more (half ounce +) of the Cabot cheese, it would move to a point, but I kept it under 1/2 ounce. It was both tasty and filling. It tasted so good, I had a second bowl – and I counted the cheese as 1 point since I had two helpings of it!

The soup freezes well. So I will put some in the refrigerator to eat over the next couple days, and I will put some in the freezer to enjoy again in a few weeks.

Here is how I made it:

Zero-Point Taco Soup

  • 4 cans beans (black beans, kidney beans, pinto beans, great northern beans – whatever kind you like or a combination of beans. I used Kroger’s Tri-Bean Blend)
  • 1 can diced tomatoes
  • 1 large can tomato sauce OR pureed tomatoes
  • 1 qt. chicken broth (you can use less if you want your soup to be thicker)
  • 2 Tablespoons taco seasoning (add more or less, depending on your taste)
  • 1 lb. boneless/skinless chicken breasts
  • diced onion, peppers, garlic – to taste (can use fresh or dehydrated)
  • salt/pepper to taste

Directions:

  1. Dump everything into a large saucepan (or crockpot)
  2. Bring to a simmer
  3. Once chicken is cooked through, take it out, shred it, and add it back into the soup.
  4. To serve, you can top with sour cream or Greek yogurt, grated cheese, corn chips – whatever toppings you like

Zero Points on WW Blue Plan. Be sure to add points for any toppings you choose.

1-Point LARGE Cafe Latte!

Unsweetened vanilla almond milk and Golden monkfruit sweetener

When I got home from an appointment earlier today, I wanted a latte or macchiato; I needed an early afternoon energy boost. I started to make a caramel macchiato but then noticed that the jar of sugar-free caramel had “Refrigerate after opening” on it. It has been sitting next to my espresso machine for a couple months. I tossed it in the trash.

With no caramel (except full sugar – which would add 6 points for 2 tablespoons – and I would want more than 2 tablespoons!), I decided to go with a latte instead.

I got a large glass and filled it with ice. Then I poured 4 ounces of espresso over the ice. And since I REALLY like my coffee drinks sweet, and since I had just bought a bag of golden monkfruit sweetener, I added 1 1/2 Tablespoons of it to my latte.  I finished filling up the glass with unsweetened vanilla almond milk, and stirred it.

The golden monkfruit sweetener is a brown sugar replacement. So it gave the latte a caramel-y flavor – which I loved.

Weight Watchers points? The only ingredient with points is the almond milk – and it’s 1 point for 1 cup. I used less than a cup, but will count a full point anyway. It is delicious! Just imagine: a large coffee drink for 1 point! I will be making these more often!

Get Outside! An Atomic Habit

Atomic Habits: An Easy & Proven Way to Build Good Habits & Break Bad Ones by [James Clear]Sometimes we come across a book that actually changes our lives. That happened to me a couple years ago when I read a book titled Atomic Habits by James Clear.  The basic premise is that if we set big goals, we often set ourselves up for defeat since big and perfect goals take so much time and effort. However, if we work on small habits – 3 minutes of exercise each morning, cutting out one teaspoon of sugar in our coffee, writing one thank you note each week, making two business calls before lunch – then it becomes like compound interest. The benefits snowball over time.

Back in March when this pandemic isolation began, I decided that one atomic habit I wanted to develop was getting outside for just a few minutes each day.  Here is a video I made on today’s walk. Excuse the breathlessness! I had just walked up a hill. I could’ve waited till I caught my breath to start the video, but this is calling “Living Real with Carol!” and the reality was that I was a little breathless at the moment.

7-Point Pizza (WW Blue)

I made personal pizzas tonight – one for my husband and one for me.  Pizza is one of my all time favorite dishes!  The last time we had pizza was during the summer when I ordered one from Domino’s Pizza, and it was less than delicious. It was so bad, in fact, that it turned me off from wanting pizza for a couple months.  However, lately after eating so much chicken and tuna and lean beef, I have yearned for something a little more indulgent.

After reading about 2-ingredient dough, and then researching and finding an even better (supposedly) dough recipe, I decided to give home-made pizza another try.

First the dough. I got the recipe from My Bizzy Kitchen. Here’s that recipe:

Dough:

2 cups self-rising flour

1 teaspoon yeast

1/2 teaspoons salt

1/2 cup Fage Fat Free Greek Yogurt

1/2 – 3/4 cup warm water

  • Heat oven to 450 (see notes).
  • In a bowl, mix the flour, salt and yeast together. Stir in the yogurt and mix until it starts to combine. Start with 1/2 a cup of water and see how the dough comes together. If there is still a bit of loose flour in the bowl, add a couple tablespoons of water at a time, until it forms a ball.
  • This dough can be used within an hour of making, but truth be told, I normally don’t use it until day 2 or 3. On the first day I let it rise in my microwave all day, then store it in a ziplock bag.
  • On the day of baking, add a tablespoon of flour on your counter. Wet your hands and grab desired amount of dough for your pizza. Most of my individual pizzas are 5 ounces. Top with desired toppings and bake for 10 minutes, or until desired doneness.

I didn’t  put my dough in the microwave to rise. As a matter of fact, I didn’t let it rise at all because we were making pizza right away.

I divided the dough into four equal parts. We used two of those for our two individual pizzas tonight. I put the other two parts in a Ziplock bag in the refrigerator for pizza later this week. (Note added: We used the extra dough three days later for another two pizzas, and it was perfect! So it keeps well in the fridge for at least three days). The flour is the only ingredient with points. So each of the four parts contain 1/2 cup self-rising flour – which is 5 points on WW Blue Plan.

The photo above shows our two pizzas ready to go in the oven. That’s mine on the bottom – and Ron’s at the top. He added additional sauce on top of his other ingredients. It looks like a barbecue pizza, but it isn’t – just lots of pizza sauce! That’s because he doesn’t usually each much pizza crust because of his blood sugar. Thus, he wanted to be sure he had plenty of the toppings.

In the photo above, the pizzas are on a pizza stone that I bought from Pampered Chef years ago. I had put the pizza stone in the oven while I made the dough. So it was piping hot when we put the dough on it.

I sprayed my hands with butter flavored Pam to smooth out the dough on the pizza stone. Then once we had it spread out, my husband and I added our favorite toppings.

Toppings

These are the toppings I put on my pizza:

Onion, finely chopped (0 points)

fresh spinach, torn into small pieces (0 points)

fresh chopped tomatoes (0 points)

Ragu Homemade style Pizza Sauce (1 point for 1/4 cup)

Sargento Light mozzarella string cheese (1 point per stick), cut crossways into thin circles. In the photo above, you can see the small circles of mozzarella.

3/8 oz Cabot Cheese, Sharp Cheddar, 75% Reduced Fat (0 points for 3/8 oz.)

At the top of this post is a photo of my baked and ready-to-eat pizza. I forgot to take a photo until I had cut it and put the pieces on a plate.  It was delicious! The crust has a little bit of a tangy taste from the yogurt. I really liked it. One great thing about this recipe is that the dough took only a few minutes to put together. And, of course, the toppings were delicious.

And the best thing of all is that the whole pizza is only 7 points. My first pizza in over two months. And I still have 5 points left for today!

Commitment versus Motivation/Willpower

I am a member of many Weight Watchers groups on Facebook. One frequent comment that is posted numerous times a day by many different people is something along these lines:

I lost my motivation. What can I do to get it back?

I do really well all day, but then at night I lose all my willpower!

I keep forgetting to log my food, and by the time I remember I’m already over my points for the day, and I just give up! What can I do to get the motivation to get back on track?

Recently I read that the difference between succeeding or failing is in whether we rely on motivation/willpower or we rely on commitment.  Motivation and willpower are hard to pinpoint. They’re often intangible and vague, whereas a commitment is a concrete thing,

Back in July when I MADE THE COMMITMENT to start WW again, I knew that this time was different. I wasn’t going on a diet. I wasn’t going to “try” this and see if it would work. I was committed to a different way of living for the rest of my life.

As I write this, it is 10:30 in the evening. Awhile ago, I heard the Baked Cheetos in my pantry calling my name. I’ve used all my daily points, I have only 7 weekly points left, and I still have two more full days before my points re-set for a new week.  I craved those salty, cheesy, and crispy Cheetos. However, I reminded myself of my commitment to REAL change. And real change is learning to say no to those cravings. The more I give in, the more I give in. The more I resist, the more I resist. I know I’m not hungry. I had a healthy dinner and I had some grapes for an after-dinner snack. I’ve had more than enough food today. So I bypassed the pantry and wrote this post instead.

Then I thought of the quote above: Commitment strengthens over time but begins with a single decision. Next time those Cheetos call my name, it will be easier to decide to forego them. The only way to stop eating late in the evening is to stop eating late in the evening. Each single decision I make that supports my commitment makes me a stronger and better person.

2-Ingredient Dough – Bagels and Rolls

In all the WW groups I’ve joined on Facebook, I have heard a LOT about 2-Ingredient dough. So I decided to try it out.

It is simply equal parts self-rising flour and nonfat Greek yogurt. However, people kept mentioning that the dough is very sticky and that it works better to have a little less yogurt.  Here is what I did:

2-Ingredient Dough

3 cups self-rising flour (37 points) I made sure to be accurate with this measurement so I could figure the WW points. Set aside about 1/4 cup to use later.

2 1/2 cups Fage nonfat Greek Yogurt (0 points)

Mix the 2 3/4 cups flour with the yogurt in a bowl.. Turn out on a pastry board/sheet or on a piece of parchment paper. Knead briefly – using the 1/4 cup flour you set aside to add, as needed, to get it to a smooth ball.  Cut into 16 equal pieces.  I used a pastry cutter to cut the dough ball in half – then cut each half in half, etc.

Shape each piece into a ball.

I took some of the balls and rolled them out long and thin, sprayed with butter-flavored Pam, and then generously sprinkled cinnamon on them. Then I rolled them up (like a cinnamon roll), pressed them down, poked a hole in the middle. Voila! Cinnamon bagels.

Some I left plain, and others I sprayed with butter-flavored Pam and sprinkled “Everything but the Bagel” seasoning on them.

They turned out pretty good. They’re a little tangy, thanks to the yogurt. The only points come from the flour.  So 37 total points divided by 16 is equal to about 2.3 points each.  So one rounds off to 2 points, but two of them round off to 5 points.

I tried both the cinnamon and the “everything but the bagel” – and the cinnamon won, hands down.  Spread a little “Simply Fruit” spread on it – and yummy!

Artificial Sweeteners – pro and con

Today I was thinking about all the foods I’m eating lately that have artificial sweeteners. Not good. I don’t want to live the rest of my life using artificial sweeteners because they definitely do not promote good health.

So, with that in mind, I am going to phase them out. I will figure out healthy ways to enjoy sweets naturally with moderation and common sense. It may be that I have to stop them altogether, or I may only use Stevia and monkfruit. I need to do some research to get more information to see if there are any that are truly safe.

I’ve enjoyed the muffins that I have made with sugar-free cake mixes. However, I bet I can find muffin recipes without the fake stuff that will be low points AND tasty. So that will be my goal for the next few weeks.

Zero Point Cheesecake

I saw a recipe today for a zero-point cheesecake.  I read over the directions and decided to make it. Of course, I made my own changes to it.  The only artificial sweetener I use is Stevia.  I use only Stevia because I have grown Stevia in my garden before. It’s in the mint family. I’ve chewed on the leaves – and they’re unbelievably sweet! So at least the origin of Stevia sweetener is natural. I know they add artificial stuff to get it into a powdered form. Still, it’s better than sweeteners that are completely concocted in chemistry labs.

I also added an additional egg – to make 4 altogether. The reason I did that is to make the batter thicker and for it to have more substance when it is chilled.

Since I had a big juicy lime in the refrigerator, I decided to make this first one a lime cheesecake.

How did it turn out? This cheesecake is delicious!  I have to admit that I couldn’t wait the recommended two hours for it to cool. So my husband and I split a slice of warm cheesecake.  It makes 8 generous servings.  I used a large deep dish pie plate that I had.  Next time I will use a regular pie plate.

Next time I plan on making a marble cheesecake. Once the batter is in the pan and before I bake it, I will drizzle some sugar-free Hershey syrup on it, and then use a spoon to swirl it through the batter. I will measure the syrup first to be sure and get an exact count of points. The chocolate syrup will probably make the slices 1 point each instead 0 points.

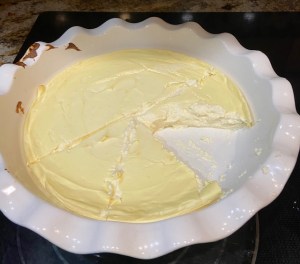
The only ingredient with points in the recipe below is the sugar-free pudding mix. It is 3 points per box. So there are three points in the entire cheesecake.  Technically, that would be 0 points per slice if you make 8 slices.  If you eat more than one slice, I’d count 1 point.

Zero-Point Cheesecake

4 Eggs (0 points)

3 cups Plain Fat-Free Greek Yogurt (0 points)

1 pkg. Instant sugar-free/fat-free cheesecake pudding mix (3 points per box)

1 tsp. Vanilla (0 points)

3 Tablespoons Stevia (0 points)

Pam spray (0 points)

Optional: Flavorings (juice of one lemon or lime, some almond extract, a swirl of sugar-free chocolate syrup, etc.)

  • In a large mixing bowl, combine the eggs, Stevia, vanilla extract, and any other flavoring you’d like.

  • Mix well.

  • Add the yogurt and pudding mix.

  • Mix well.

  • Lightly spray a pie dish with Pam, and pour the batter into the dish. Spread evenly.

  • Bake for 30 minutes at 350 degrees.

  • Chill for at least two hours before serving. 

Sugar Free Banana Chocolate Chip Muffins

I saw another recipe on Facebook and decided to try it. Sugar Free Banana Muffins. It would be banana bread if you put it in a loaf pan instead of muffin tins. I wasn’t terribly impressed with them – although when they were warm and right out of the oven, they were pretty good. But they’re also on the dry side – just a little – which is not how muffins should be.  

The base is a sugar free yellow cake mix. Then use very ripe bananas, eggs, and sugar-free chocolate chips.

I like these baking chips. It comes out to just a few chips per muffin. So I chopped them in order to spread out the chocolatey goodness more.

The muffins turned out more cakey than I prefer. I’m going to add some unsweetened applesauce next time to try to change the consistency and moistness.

Here’s the recipe I used:

Sugar Free Banana Chocolate Chip Muffins

1 box Pillsbury Sugar-Free Yellow Cake Mix
3 eggs
3-4 ripe bananas, mashed
81 grams Lily’s semi-sweet Chocolate chips (optional)

Mash the bananas, add the eggs, and mix well.
Add the cake mix and mix well.
Divide evenly among 12 muffin tins.

3 points (blue) per muffin without chocolate chips
4 points (blue) per muffin with chocolate chips